Blog

  • Desperate times, desperate measures: dealing with a Go dependency Jenga tower

    Desperate times, desperate measures: dealing with a Go dependency Jenga tower

    TL;DR

    If you absolutely have to manually update your glide.lock file to add a specific SHA1 for a dependency and can’t do it right with glide update, edit glide.lock as needed, then:

    go get mattfarina/glide-hash
    glide hash

    This gets the correct checksum for your glide.lock file; update the hash: line at the top. You can now glide install without warnings.

    The detailed explanation

    Our microservices have a number of dependencies, one of which is logrus. Logrus is a great logging package, but was the trigger of a lot of issues last year when the repository was renamed from github.com/Sirupsen/logrus to github.com/sirupsen/logrus.

    That one capitalization change caused havoc in the Go community. If you don’t understand why, let’s talk a little about dependency management in Go. (If you do, skip down to “The detailed fix”).

    Go doesn’t have an official dependency management mechanism; when you build Go code, you pretty much expect to compile all the code it will need at once. Go goes have a linker, but generally we really do just build a single static binary from source files, including the source of libraries too. The Go maintainers decided that it’s simpler to store one set of source code to be pulled in and complied rather than store compiled libraries for multiple architectures and figure out which one needs to be pulled in. The Go compiler is pretty fast, and maintaining multiple native binary versions of libraries is hard.

    Originally, all source management was done with go get, which would fetch code from a VCS endpoint and put it in the appropriate place in the GOPATH (essentially the location where “stuff related to but not part of this Go program” lives) so that it could be picked up during a compile. This is super simple, but fails in a number of ways: a set of go get commands are a set of commands, and have to be run before the program can be built. This may not be reproducible (if someone makes a new commit to the library, the HEAD changes). Telling go get to fetch a specific version of a library is harder to do. go get is great at pulling a specific isolated library, but not good at managing transitive dependencies: e.g., we’ve installed library foo, but it needs library bar to perform some functions, and bar needs baz to do some of its work. We’d really like to see all of these figured out and installed at once, and to not have to remember what all the dependencies are, or to have to have a script to run to fetch them. We’re potentially running on multiple architectures, and we don’t want to have to maintain multiple executable scripts just to fetch our dependencies.

    Go’s first cut at solving this was the vendor directory. This directory lives in the same tree as the Go source and can be committed to the VCS, so one could get the required sources into the vendor library, then commit the “known-good” version. This works for the versioning problem, mostly, but means that it’s easy for many slightly different versions of those libraries to end up spread across multiple source code repositories, and keeping them synced up for fixes is difficult, and it doesn’t address the transitive issues at all. To fix this, the Go community built unofficial source management tools to handle versioned access to the vendor directory plus automated detection and resolution of transitive dependencies.

    The problem is that because the Go community is large, inventive, and active, we have a lot of them. We’ve already used two different tools: Godep and, currently, glide, and are probably going to switch to dep, which looks to eventually be the standard dependency management tool blessed by the Go core team. [Update: wrong again. go mod is the current official winner.]

    glide (our current tool, as noted) manages dependencies with two files: glide.yaml, which describes enough of the direct dependencies and their versions that all of the dependencies and their own transitive dependencies can be figured out. The glide.lock file stores the results of this dependency resolution as specific VCS commits (SHA1 hashes in the case of Git), allowing us to quickly fetch exactly what we want when getting ready to compile the code.

    Like any other piece of software, the glide files have to be kept up to date, especially if there are dependencies on outside libraries (from Github and the like) by periodically doing a glide update to update dependencies in the glide.lock file that aren’t locked to a specific version (or range of versions) by glide.yaml. If one falls behind on this, or a change such as the Sirupsen/logrus to sirupsen/logrus one happens, or you simply need to upgrade something to a new version, these files can end up in a state where a glide install still works, because this simply downloads the revisions dictated by glide.lock without attempting dependency resolution again, but glide update doesn’t, because the glide.yaml didn’t limit the possibilities enough, and attempting resolution of the dependencies fails.

    To fix this, we can do it one of two ways:

    1. The right way, which entails plodding through all the revisions until we’ve found a new set that works, fixed the glide.yaml file so that it defines that new set, and then used glide updateto download them and rewrite glide.lock. This can be excruciatingly difficult, as it’s possible that the updated glide.yaml will no longer resolve, or will resolve the dependencies in ways that won’t actually build, and there will have to be many update/download/compile cycles to actually fix the issue.
    2. The wrong way, which is to muck around with glide.lock directly, adding or changing something without making sure that glide.yaml “compiles” to the updated glide.lock. This gets us back on track with code that builds and runs, but leaves us in the dangerous situation that glide update is now broken.

    The detailed fix

    If you näively go the wrong way and just make changes to the glide.lock file, glide tries to be a good citizen and warn you that you’ve done something you ought not to:

    [WARN] Lock file may be out of date. Hash check of YAML failed. You may need to run 'update'

    appears when you glide install.

    As noted, the problem is that if you run glide update, you’ll break everything because you didn’t fix glide.yaml first. And maybe you just don’t have time to find the right incantation to get glide.yaml fixed just now.

    So, you lie to glide, as follows.

    1. Add the dependency to glide.yaml.
      • Edit glide.yaml and add the dependency plus its version if it has one. (Use master if you want to track HEAD or a specific SHA1 if you want to pin it to that commit.)

        - package: github.com/jszwec/csvutil
        version: 1.0.0
    2. Add the dependency to glide.lock.
      • This one must be the SHA1; the easiest way to get this is to go to the repository where it lives and copy it down. I won’t go into detail here, but however it works in your VCS, you’ll need the full SHA1 or revision marker.

        - name: github.com/jszwec/csvutil
        version: a9cea83f97294039c58703c4fe1937e57ea5eefc
    3. If we stopped at this point, we’d get a warning from glide install that would recommend that we use glide update instead to install the required libraries. In our case, with a delicate web of dependencies between local libraries and Echo, openzipkin and Apache Thrift, and the two different versions of logrus, a glide update breaks one or more of these dependencies when we try it. To prevent someone else from spending way too much time trying to resolve the problem by juggling versions in the glide.yaml in the hope of creating a stable glide.lock, we need to fix the computed file hash at the top of the glide.lock file so that the warning is suppressed.

      This is a hack! The best option is probably to import all the SHA1’s into the glide.yaml file as versions, ensure glide update works, and then gradually relax the constraints until glide update fails again, then back up one step.

      To calculate the hash, we can go get mattfarina/glide-hash, which creates a new glide hash subcommand that does exactly that and prints it on the console.

      We install the subcommand plugin as noted, then cd to the codebase where we need to fix the glide.lockfile. Once there, we simply issue glide hash, and the command prints the hash we need. Copy that, edit glide.lock, and replace the old hash on the first line with this new one.

      Warning!

      This is absolutely a stopgap solution. Sooner or later you’re going to need to update one or more of the libraries involved, and you really will want to do a glide update. Yes, you could keep updating this way, but it would be a lot better to solve the problem properly: go through all the dependencies, update the ones you need, and then make the necessary fixes so that your code and the library code are compatible again.

  • Postgres array_to_string() and array_agg() to decouple your interface

    Let’s say you’ve got a collection of job data for a set of users that looks like this, and you want to create a nice summary of it to be displayed, with a count of how many jobs are in each category for each user, all on one line.

     │id │ user_id │ job │ status    │
     ├───┼─────────┼─────┼───────────┤
     │ 1 │ 12      │ 1   │ Completed │
     │ 2 │ 12      │ 2   │ Cancelled │
     │ 3 │ 14      │ 3   │ Ready     │
     │ 5 │ 14      │ 4   │ Completed │
     │ 6 │ 14      │ 4   │ Completed │
     │ 7 │ 14      │ 4   │ Cancelled │
     ...

    Here’s  the report of summarized statuses of jobs for each user that you want.

    │ user_id │ summary                           │
    ├─────────┼───────────────────────────────────┤
    │ 12      | 1 Cancelled, 1 Completed          │
    │ 14      | 1 Cancelled, 2 Completed, 1 Ready │

    I’ll show you how it’s possible to provide this solely with a Postgres SELECT.

    (more…)

  • Reducing Google access for Pokemon GO

    Pokemon GO players on iOS: the new release today (7/12/16, in the App Store now) reduces the information it wants from your Google account from “full access” to your email and “know who you are on Google”. If you were already signed up, do this:

    • Go to accounts.google.com; log in if you’re not already logged in
    • Go to https://security.google.com/settings/security/permissions
    • Click on “Pokemon GO release”
    • Revoke privileges
    • Go to your iOS device
    • Download the updated app, wait for it to reinstall
    • Kill the app; if you don’t know how to do this, just power your phone off and back on again
    • Launch Pokemon GO; it’ll fail to get access to your account. THIS IS OK.
    • Tap “try another account”
    • Log back in with your Google username and password.
    • This time it should ask for only “know your email” and “know who you are”.

    At the time I write this, it looks like many people are doing this, as the Pokemon GO servers are rendering the server overload screen:

    IMG_2165

    For the paranoid: It sounds like the iOS programmers just screwed up and released without reducing the account permissions request; this is not a nefarious scheme to steal all your email and Google+ naked selfies. From Niantic (via Kotaku):

    We recently discovered that the Pokémon GO account creation process on iOS erroneously requests full access permission for the user’s Google account. However, Pokémon GO only accesses basic Google profile information (specifically, your User ID and email address) and no other Google account information is or has been accessed or collected. [Emphasis mine – JM] Once we became aware of this error, we began working on a client-side fix to request permission for only basic Google profile information, in line with the data that we actually access. Google has verified that no other information has been received or accessed by Pokémon GO or Niantic. Google will soon reduce Pokémon GO’s permission to only the basic profile data that Pokémon GO needs, and users do not need to take any actions themselves.

  • A quick note on Mac malware

    The most recent bit of OS X malware making the rounds is a fake file converter program that installs a PHP backdoor accessible via Tor, allowing some rando to rummage around on your machine. As is usual, you, the victim, have to download the software, and run it, and allow the program to install its backdoor code.

    If you want to protect yourself from malware on your Mac, there are three principal things you can do.

    1. Don’t download software if you’re not 100% sure of its provenance, function, and dependability. Just because it’s on MacUpdate doesn’t mean it’s okay.
    2. If you do accidentally download something – say you’re using one of those dodgy file-sharing sites with fifteen ads masquerading as the real download button – don’t run it. Just delete it.
    3. If, despite all this, you did download something and run it, under no circumstances enter your administrator password when it asks to install “support software” or the like unless you know exactly what’s going to happen if you do.

    You still have the backstop that nothing is going to get installed as a persistent backdoor if you don’t enter your administrator password when prompted, but it’s trivially easy to build a backdoor that runs only when the software is running. Don’t run random programs you aren’t sure you can trust. Find a trusted third party that knows for certain that the program is safe.

    If you insist on living dangerously, there are a couple utilities I’ll mention below that will allow you to try to prevent the damage, and I emphasize try. They are no guarantee of safety; if you download pirated software or random things to “try them out” or “see if they work”, you’re sooner or later going to mess yourself up. These monitors are counting on your personal software sophistication to protect yourself from harm. They are only useful if you understand what they are telling you.

    I run the programs I mention below not because they magically keep me safe from bad programs, but because I like to know what’s going on behind the scenes on my Mac. If you aren’t certain you know what ~/Library/LaunchAgents does, or what a connection over port 443 means, you may not want to try using these programs, because they will confuse you; if you try to use them by simply blocking everything, you’ll find that things that are actually supposed to make outgoing connections (like Mail) will stop working, and that software that really needs to install agents, like Dropbox, will break. Conversely, if you just say “yes” to everything, things like the fake file converter mentioned above will get to install their hooks and they will allow who knows who to read your mail and download your naked selfies.

    If I haven’t lost you at this point – you understand OS x/Unix well enough to understand what connections are good and what ones are bad, and you know what a file in ~/Library/LaunchAgents is for:

    • Little Snitch is a program that sits in the background and alerts you whenever your machine tries to make a network connection, whether incoming our outgoing. If you don’t respond, the connection is automatically blocked. You can add rules to automatically allow or automatically block connections. This utility will let you know if someone is actively trying to connect to your machine, or if your machine is trying to make an unexpected outgoing connection.
    • BlockBlock is a utility that monitors attempts to install long-running processes like the one that constitutes the Tor/PHP backdoor and reports them to you with the option to block them. In the case of EasyDoc Converter, it’d be pretty easy to spot that the software was up to no good, as it’s attempting to install stuff named “dropbox” in an attempt to hide their nasty software as part of good software.

    As helpful and useful as these monitors are – I run them, and I like them – they’re still not going to 100% protect you from what happens if you run random things you download from the Internet, especially if you say “sure, why not?” when they ask for your administrator password.

    Just avoid the off-the-wall random links and wait until someone reputable has said, “yeah, that’s good” before trying it.

  • Squashing commits in the same branch

    Okay, I’m sure this is documented lots of places, but I just now figured out that git rebase -i is perfectly happy to rebase from a commit on the same branch, so if you’ve got a branch that you’d like to smoosh some commits on, do a git log to get the SHA1 of the initial commit, then

    git rebase -i <SHA1>

    It will happily show you all the commits and you can then twiddle to your heart’s content to clean up.

  • Creating a submissions log with Airtable

    Okay, so Twitter ads were useful for once. They pointed me to Airtable, which is a very slick site which is halfway between a spreadsheet and a database. You create tables, like you would in a database, but adding, updating, and deleting columns is as easy as doing the same for a column in a spreadsheet – plus you can link between tables easily.

    I was asked to put together a very simple submissions tracking application. “Show me a list of markets with deadlines, and a list of what I’ve sent where, the date I sent it, and the date I heard back”. I was able, with the help of Airtable, to put this together very quickly. (I would note that the sample sales tracking database was instrumental in understanding how to set things up; I encourage anyone who wants to try their hand at a similar application take a look at the samples, which are really well done.)

    One design note: you’ll make it easier on yourself if you go bottom-up in your design. It’s possible to go top-down, but it means creating columns that you have to backfill later with links; in my case, I created the submissions table first, which is dependent on the pieces and markets. Because I did it that way, I ran into the restriction that the first column can’t be a link, and I had to change it to a formula text column instead. I’ll show it last, because it’s easier to understand that way.

    I created a table of “pieces” – things to be submitted. This was pretty simple: a title, the kind of piece, date written, and a notes field – “everything needs a notes field.”

    Pieces table

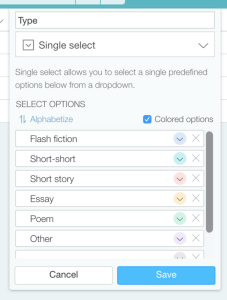
    The kind is a selection column:

    Piece type field

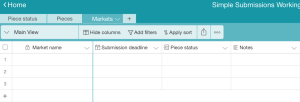
    Then a table of markets – places to submit things. That had a name, a deadline date (most markets have submission deadlines; even though those change, it’s easier to put in the current one and update it later than to try to have a table of them and fill in the right one – simple is the watchword), and of course notes.

    Markets table

    Now we can properly fill out the Submissions table. The first column, because it can’t be a table link, was set to

    Piece & “sent to ” & Market & “on ” & {Date submitted}

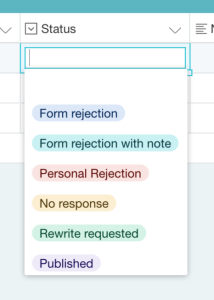
    (This means empty records have a note that reads “sent to on”. Oh well.) Market is set to a link to the Markets table, and Piece to the Pieces table. Date submitted and response date are of course dates, and the Response is another selection column:

    Submission status field

    Plus as always, notes. Here’s the final table:

    Screenshot 2016-01-20 23.52.24

    To use this, one adds pieces to the Pieces table and markets and deadlines to the Markets table. The Markets table can be sorted by date to see where pieces can usefully be submitted, and the submissions logged in the Submissions table by clicking on the Piece and Market cells to fill them in from the available options, followed by the submission date once they’re sent out. The table has to be updated manually once a response comes back.

    The filters and sorting can be used to figure out what’s out to a given market, what’s been rejected or accepted  by a given market, what’s been sent to a market, and so on – and it provides a handy log, when sorted into submission order, of the work done; filtering even lets one see how much has been done over a period.

    This was demoed and found to be very usable. The flexibility to add more data to better slice and dice how submissions are going should make this easy for to customize as needed.

    There are some shortcomings:

    • Sharing is only by email, so I can’t put up a public copy of this Airtable to show off.
    • Lock-in: I can’t run this anywhere else; when it passes 1200 records, I’ll have to upgrade to a pay tier – and if Airtable goes poof, so does my database.
    • I can’t do full-up relational queries, like “show me all the short stories rejected by market X or Y” easily. I can use filters to select only the short stories and items with status rejected and in market X, but “or” operations are harder.
    • Automatically creating many-to-one, one-to-many, and many-to-many mappings may be possible but they’re not straightforward.
    • It’s possible to do backups, but not easy. Snapshots are OK unless there’s a data loss at Airtable, in which case the data might be permanently gone. My best option is probably to write a program using the Airtable access APIs to pull the data and back it up locally, and write another to reload it in such a case. (The tables would have to be reconstructed; there’s no way to download a schema or upload one, either.)

    Overall, because I needed to put together something simple, usable, flexible, and done  in a very short time, Airtable was the right call for this application.


  • An open letter to my namesakes

    Hi, all you other Joe McMahons out there.

    I’m sure you’re all great guys, a pleasure to know, upstanding in your community, and a blessing to your families. Kidding – I know at least one of you wanted to cheat on his wife.

    “Why would you say a thing like that! How could you possibly know that?”

    Well, Google tells me. I take that back – actually, you tell Google to tell me, via Gmail.

    Many of you seem to have the bad habit of using our name @ gmail.com when you are asked for an email address. I am at a loss as to why you do; magical email fairies are not going to deliver you mail because you tell gmail your name. I’m guessing it’s just plain laziness and not being willing to bother to spend the grueling 2 minutes it takes to set up a Gmail account.

    This is why all the places you set up accounts for always break, and you can’t log in anymore. Because it’s my frigging email account, you dolt.

    Whenever you set up an account to post a personal ad in Liverpool, or sell your used van, or buy a new laptop and set up a Windows Live account, or join Ashley Madison (that was my very favorite) and use that account, I’m the one who gets the confirmation message.

    You know what I do? I confirm your account, and then I immediately reset the password on your account so it’s my account, and I set up 50-character passwords and 2-factor authentication if possible.

    You know why? Because accounts linked to my Gmail account might be usable to social-engineer someone into access to my Gmail account.

    And that’s my Gmail account. Keep your grubby paws off it. If not, well, in the words or René Belloq:

    “Again we see there is nothing you can possess which I cannot take away.”

  • “PG::UnableToSend: SSL error: sslv3 alert bad record mac”: not Postgres, not SSL

    If you see this error in the build log for your Rails app (we were getting it during our Cucumber tests):

    PG::UnableToSend: SSL error: sslv3 alert bad record mac
    : ...SQL query...

    then what you have is probably not an SSL problem, and probably not a Postgres problem. You should not turn off the SSL connection to Postgres, because more than likely not SSL causing the problem, and it’s not (directly) Postgres either, so don’t disable SSL in Postgres.

    What it most likely is, especially if it’s intermittent, is Postgres dropping a connection and then Rails trying to reuse it. This is still not Postgres’s fault.

    In my particular case, it turned out my app was using Puma to serve the app, and when you’ve got Puma in there, you need to properly configure it to work with Postgres by setting up a connection pool, like this:

    workers Integer(ENV['WEB_CONCURRENCY'] || 2)
    threads_count = Integer(ENV['MAX_THREADS'] || 1)
    threads threads_count, threads_count
    
    preload_app!
    
    rackup DefaultRackup
    port ENV['PORT'] || 3000
    environment ENV['RACK_ENV'] || 'development'
    
    on_worker_boot do
      # Worker specific setup for Rails 4.1+
      ActiveRecord::Base.establish_connection
    end
    
    on_worker_shutdown do
      ActiveRecord::Base.connection.disconnect!
    end

    This is a minimal configuration; we’re probably going to want to add more workers later. The important part is the on_worker_boot block. This tells ActiveRecord that it’s time for a new connection pool for this worker. I’ve cut the number of threads to one, as connections cannot be shared across threads.

    Once I had this in place, our build passed and all seems good. We may have to add some more workers once we go to production, but that’s a simple matter of updating the Ansible playbook to bump WEB_CONCURRENCY to an acceptable level.

    Why didn’t this show up until today? Probably because we hadn’t gotten our application’s test suite up to the point that we used up all our connections and had some drop on us. We’re still early on in our development and are just starting to hit the database a fair amount.

    I’m posting this because I searched for hours today for a solution that wasn’t just “turn off your security and it’ll be fine” – which wouldn’t have actually fixed the issue anyway.

    [Edited 11/24/15 to add on_worker_shutdown block.]

  • Note on Vagrant UID conflicts

    If you’ve restored from backup on OS X and are seeing this message when you issue vagrant up:

    The VirtualBox VM was created with a user that doesn't match the
    current user running Vagrant. VirtualBox requires that the same
    user be used to manage the VM that was created. Please re-run 
    Vagrant with that user. This is not a Vagrant issue.
    
    The UID used to create the VM was: 503
    
    Your UID is: 2612
    

    Vagrant is lying. There’s a file in the directory where you’re trying to start the Vagrant box named .vagrant/machines/default/virtualbox/creator_uid; the UID of the creator is in that file. Change it to your current UID and everything will be fine again.

  • Git: undoer of bad decisions

    I’ve been working on a major Perl code refactor since March; this is a fairly critical subsystem that unifies two slightly different ways of doing the same thing under the One True Way. I’m finally starting to come out the far end of this process, having learned several things very much the hard way.

    The biggest mistake was not working out the most stepwise possible attack on the problem. I tackled a monolith of code and created a new monolith. The changeset was over a thousand lines of moved, tweaked, hoisted, rewritten, and fixed code – a recipe for failed code review. No matter how simple it seems to you because you’ve been living with the code for months on end, the reviewer will come up against a massive wall of code and bounce off it.

    Second, I didn’t clearly establish a baseline set of tests for this code. It was, essentially, not tested. A few features were cursorily tested, but the majority of the code was uncovered. In addition, some code needed to live on the Apache web servers, and some on dumb database servers without Apache, so the structure of the code ended up being two communicating monoliths hooked up to mod_perl.

    Third, I squashed too soon. Fifty-some commits were turned into a single commit that, to be fair to me, contained only 90 lines of new code – but in fairness to everyone else, shifted a thousand lines of code around, hoisting a lot to new common libraries, and changing one set to mach another.

    The code worked, and was provably correct by my tests — but it was an utter failure as far as software engineering was concerned.

    After a very educational conversation with my tech lead, Rachel, I headed back to revisit this change and make it into something my co-workers and I could live with.

    First: build the infrastructure. I learned from the first try at the code that unit-testing it would not work well. Some of it could be unit-tested, but others simply died because they weren’t running under mod_perl, and couldn’t be mocked up to work without it. The best approach seemed to be to use a behavior-driven development approach: write the necessary interactions as interactions with an Apache instance running enough of the stack for me to test it. I decided that since, luckily, this particular part of the code had very little Javascript, and none along the critical path, I’d be able to write interaction tests using WWW::Mechanize, and verify that the right things had happened by checking over the headers and cooke jar and database.

    I started off by creating tiny commits to add a couple of support functions for the Web testing — a WWW::Mechanize subclass optimized for our site, and a couple of support methods to make constructing URLs easier.

    I then wrote a set of tests, each exercising a specific part of the code in question, and overall verifying that we had a set of tests that described the system behavior as it should be, both for good and bad inputs.

    Once this was done, I turned back to the giant monolithic commit. I knew I wanted to unsquash the commits, but I wasn’t sure how, or what was safest. After some reading, I found a good description of using git reflog and git cherry-pick to restore a branch to its unsquashed shape, and a Stack Overflow post with more hints. With a little extra consideration and checking of git cherry-pick’s options, I was able to recover the original set of commits on a new branch. Here’s how:

    1. Start with the output from git reflog. This tracks all your commits and branch switches. As long as your squashed commits point to something (in this case it’s the reflog), git won’t discard them.
    2. Scan back for the first reference to the branch that you need to unsquash. Note its SHA1, open another window, and git checkout this SHA1. You’ll now be in “detached head” state.
    3. git checkout -b some-name to create a new branch at the same point your desired branch was in when it was created.
    4. Now scroll back through the reflog, and git cherry-pick all the commits on this branch. You can save time by cherry-picking ranges (sha1..sha1), which will apply them in reflog order to the branch
    5. Continue until you’ve reached the last commit you want on this branch. You may end up skipping sets of commits if you’ve been working on other branches too; watch for branch switches away from the desired branch and then back to it.

    You may hit minor problems re-applying the commits to the branch; resolve these as you normally would, and then use git cherry-pick –continue to complete the commit or continue the set of commits.

    Once I had my original commits, I was able to cherry-pick these off the newly-recovered (and working) branch, a few at a time, and create smaller pull requests (add a test, add another test; shift code, verify the test still works; and so on).

    The final result was a series of pull requests: tests to validate the current behavior, and then a series of hoists and refactors to get half of the code to the desired point, and then another series to bring the second half in line with the first.

    Overall, this was more than a dozen pull requests, and I’m sure that my co-workers got sick of seeing more PRs from me every day, but the result was a properly-tested and properly-refactored set of code, and no one had any complaints about that.